Most transmission codes are available from the vehicle information
code plate located on the cowl (in the engine compartment). The first portion of
the code is the transmission designation; following this, there is a blank box.
At the right end of the line is the axle or final drive ratio.
On other models the transmission model and serial number are
either stamped on a plate that is bolted to the transmission case or stamped
directly on the case itself. The location varies depending on the transmission
model.
As an option on some of these vehicles, there is an electronically
controlled 4-speed automatic designated R4A-EL. The transmission is computer
controlled and has no owner-serviceable or adjustable components other than the
neutral start switch.
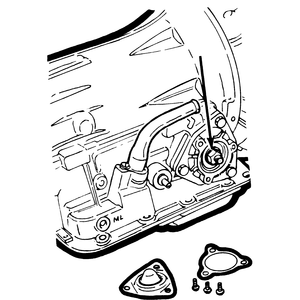
Fluid Pan
REMOVAL & INSTALLATION
On some RX-7s, certain components of the exhaust system may
have to be removed in order to remove the transmission pan.
Raise and support the vehicle.
Place a drain pan under the transmission.
Remove the pan attaching bolts (except the two at the front). Loosen the
two at the front slightly. Allow the fluid to drain.
Remove the pan.
Remove and discard the gasket.
Clean all gasket mating surfaces. Wipe the inside of the oil pan with a
clean rag. Remove any deposits with solvent and dry the inside of the pan.
Install a new pan gasket and install the pan on the transmission. Tighten
the pan bolts in a crisscross pattern. DO NOT overtighten.
Lower the vehicle and fill the transmission with fluid. Check the
transmission operation.
FILTER SERVICE
Remove the transmission oil pan as described ealier.
Remove the attaching bolts, then remove the filter assembly.
Install the filter, then torque the bolts using several passes of a
diagonal sequence to 4-5 ft. lbs. (5-7 Nm).
Adjustments
BAND
Except RX-7
On all cars but the GLC and 626, this adjustment can be made by
removing the cover located on the lower right front of the transmission (three
bolts). On the GLC and 626, the transmission pan must be removed; the servo
piston stem and locknut are visible at the left front.
Loosen the locknut.
Automatic transmission band
adjustment
Torque the servo piston stem to 9-11 ft. lbs. (12-15 Nm), then back it off
exactly two turns.
Hold the stem stationary and tighten the locknut to 11-29 ft. lbs. (15-39
Nm).
If applicable, install the transmission pan; otherwise, install the cover
on the transmission.
RX-7
The band adjustment stud is located on the right side of the
transmission under a metal cap which is held by three bolts.
Raise the car and support it on jackstands.
Remove the protective cap from over the band adjuster.
Loosen the locknut on the adjuster.
Tighten the adjuster to 9-11 ft. lbs. (12-15 Nm) using the special Mazda
socket (tool number 49-0378-345) or an equivalent tool.
Back off the adjuster two full turns.
Hold the adjuster from moving and tighten the locknut to 11-29 ft. lbs.
(15-39 Nm).
Install the protective cap.
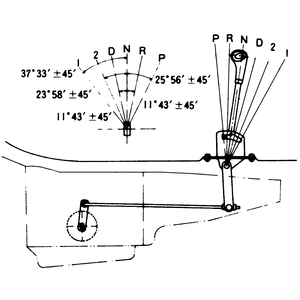
SHIFT LINKAGE
1978-84 Except RX-7
Place the transmission selector lever in Neutral.
Disconnect the clevis from the lower end of the selector arm.
Move the manual lever to the N position.
The N position is the third detent from the back.
Transmission shift linkage
adjustment
Loosen the two clevis retaining nuts and adjust the clevis so that it
freely enters the lever hole.
Tighten the retaining nuts.
Connect the clevis to the lever and secure with the spring washer, flat
washer and retaining clip.
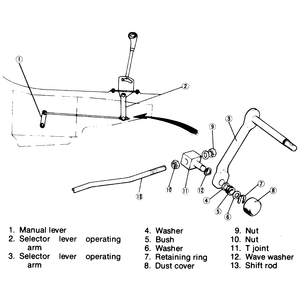
1979-81 RX-7
Shift the selector lever into the Neutral position.
Raise the vehicle and support it on jackstands.
Disconnect the T-joint from the lower end of the selector lever operating
arm.
Move the manual selector lever on the transmission into the Neutral
position, which is the third detent position from the rear of the
transmission. Adjust the T-joint so that it freely enters the hole in the
selector lever operating arm.
Shift linkage adjustment-1979-81
RX-7
Tighten the attaching nuts.
Connect the T-joint to the selector lever operating arm and secure.
Lower the vehicle and check the operation of the transmission in each
selector lever position.
1982-85 RX-7
Remove the boot plate.
Place the shifting lever in the Park position.
Loosen the selector lever plate setting bolt.
Raise and support the vehicle safely.
Place the selector rod at the Park position, the first detent position
from the rear of the transmission.
Torque the selector lever plate setting bolt to 30 ft. lbs. (41 Nm). Check
the operation after adjustment.
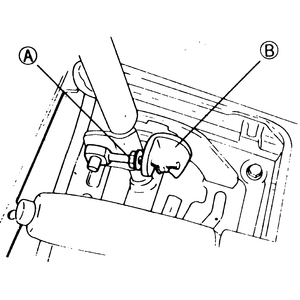
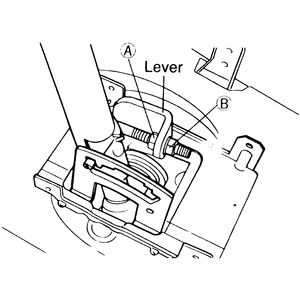
1986-89 RX-7
Remove the shifter cover.
Turn locknuts Aand Bto the proper adjusting position (see
illustration).
Move the shifter level to the Park position.
Shift the transmission. Make sure the vehicle is supported safely when
working underneath.
Shift control lever adjustment-1986-89
RX-7
Turn locknut Aby hand until it just touches the shifter lever, then
back it off 1 full turn.
Torque locknut Bto 8 ft. lbs. (11 Nm).
Move the shifter and make sure there is a click at each gear when shifting
from Park through 1st. The positions of the selector lever and the indicator
should be exact. The release button should return smoothly when used to shift
the selector.
929
Remove the console shifter cover assembly. Position the transmission
selector lever in the Park detent.
Loosen locknuts Aand B(see illustration). Move the selector
from the Park range by moving the manual shaft linkage on the transmission.
Using a feeler gauge, check the clearance between the first locknut,
behind the shifter bracket. Adjust the shift lever and locknut to 0.04 in.
(1mm).
Shift control lever
adjustment-929
Remove the feeler gauge and tighten locknut B.
On 1989 929s, measure the clearance between the guide plate and the guide
pin in the Park position. There should be about 0.04 in. (1mm) clearance on
the front side and about 0.02 in. (0.5mm) for the rear side.
Move the selector lever through the other gear ranges and check to be sure
that there is clearance between the selector lever bracket and the guide pin.
If clearance does not exist, readjust both locknuts.
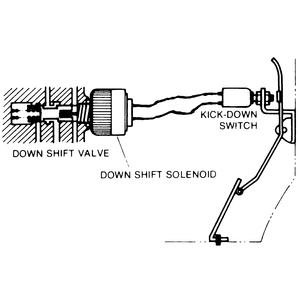
KICKDOWN SWITCH & DOWNSHIFT SOLENOID
Except 626
The kickdown switch is located on the accelerator linkage above
the pedal.
Check the accelerator linkage for smooth operation.
Turn the ignition ON, but do not start the engine.
Depress the accelerator pedal fully to the floor. As the pedal nears the
end of its travel, a light click should be heard from the downshift solenoid.
Kickdown switch and downshift solenoid
adjustment
If the kickdown switch operates too soon/too late, loosen the locknut on
the switch shaft. Adjust the shaft so that the accelerator linkage makes
contact with it when the pedal is depressed approximately
7/8 of the way to the floor. Tighten the locknut.
If the switch is operating properly, check the solenoid by listening as an
assistant depressed the pedal. If no noise comes from the solenoid, check the
solenoid wiring and the switch.
If the circuit is in good condition, remove the wire from the solenoid and
connect it to a 12V DC power source. If the solenoid does not click when
connected, it is defective and should be replaced.
When the solenoid is removed, about two pints of transmission
fluid will leak out; have a container ready to catch it. Remember to add more
fluid to the transmission after installing the new solenoid.
626
Disengage the wiring connectors from the kickdown switch.
Unscrew the kickdown switch a few turns.
Fully depress the accelerator pedal.
Gradually thread in the kickdown switch until you hear a clicking sound
then tighten it inward 1/2 turn more.
Tighten the locknut and attach the wiring connectors.
Neutral Safety (Inhibitor) Switch
REMOVAL & INSTALLATION
Disconnect the linkage from the gear selector lever on the switch.
Unbolt and remove the switch from the transmission.
Place the new switch onto the transmission and bolt it in place.
Connect the selector lever linkage and adjust the switch.
ADJUSTMENT
GLC
Adjust shift linkage as described earlier. Put the selector lever in the
Neutral position (3rd detent from the rear).
Remove the transmission manual lever retaining nut and pull the lever off
the switch.
Loosen (do not remove) the two switch retaining bolts and remove the
alignment pin hole screw at the bottom of the switch.
Adjusting the GLC neutral safety
switch
Gently rotate the switch back and forth while attempting to insert a 0.08
in. (2mm) diameter pin into the alignment pin hole. When alignment is correct,
the pin will slide through the hole in the internal rotor. Tighten the switch
attaching bolts and remove the pin.
Reinstall the alignment pin hole screw. Position the manual lever back
onto the switch shaft, then install the washer and nut.
Check switch operation. If the switch still does not work, i.e., the car
starts in positions other than Park or Neutral, replace the switch. With the
key in the ON(not START) position, shift the selector into
Reverse; the backup lights should be on. If not, check the bulbs and wiring or
replace the inhibitor switch.
626
Place the transmission selector lever in the Neutral position.
Loosen the neutral switch attaching screws.
Position the manual shift lever shaft in the Neutral position by adjusting
the range select lever. The proper Neutral position is where the slot of the
manual shaft is positioned vertically and the detent position in the shaft
engages correctly with a click sound.
Move the neutral switch so that the identification marks on the switch
body and the sliding plate are aligned.
Tighten the neutral switch adjusting screws.
Check the adjustment by trying to start the engine in all gears. It should
only start in Park and Neutral.
929 and RX-7
Shift the selector lever to the Neutral position.
Raise and safely support the vehicle.
Loosen the inhibitor switch mounting bolts.
Unfasten the screw underneath the switch body.
Move the switch body so that the screw hole in the case aligns with the
small hole inside the switch.
Inhibitor switch adjustment-929 and
RX-7
Check the alignment by inserting a 0.08 in. (2mm) diameter pin through the
holes. Once the proper alignment is obtained, remove the pin and tighten the
switch mounting bolts. Install and lightly tighten the screw.
Check the system for proper operation. If the switch still does not work
(it still allows the car to start in positions other than Park or Neutral),
replace the switch. With the key in the ON(not START) position,
shift the selector into Reverse; the backup lights should be on. If not, check
the bulbs and wiring or replace the inhibitor switch.
Transmission
REMOVAL & INSTALLATION
GLC and 626
Disconnect the negative battery cable.
Drain the transmission.
Remove the heat insulator.
Disconnect the exhaust pipe.
Disconnect the driveshaft at the rear axle flange.
Remove the driveshaft.
Disconnect the speedometer cable.
Disconnect the shift rod.
Remove all vacuum hoses.
Disconnect all wiring.
Disconnect the oil cooler lines.
Remove the access cover from the lower end of the converter housing.
Matchmark the drive plate and torque converter for realignment, then
remove the converter bolts.
Support the transmission with a jack and remove the crossmember.
Remove the converter housing-to-engine bolts.
Remove the filler tube.
Separate the flexplate and the converter.
Remove the transmission and converter as an assembly.
To install:
Raise the transmission into the vehicle, then align the matchmarks on the
torque converter and the drive plate. Install the drive plate bolts and
tighten them evenly.
Install the filler tube.
Install the converter-to-housing bolts and tighten them evenly.
Install the crossmember and remove the transmission jack.
Attach the access cover to the lower end of the converter housing.
Connect the oil cooler lines, vacuum hoses, shift rod and speedometer
cable.
Install the driveshaft and connect the exhaust pipe.
Install the heat insulator and fill the transmission to the proper level
with Type F fluid. Adjust the shift control linkage and the neutral safety
switch as required.
929
To remove and install the drive plate bolts, a special angle
wrench/adapter (No. 49-0877-45) is required. This wrench has a cutout in the
center to accept the drive of a torque wrench.
Disconnect the negative battery cable.
Remove the transmission oil level gauge.
Raise and support the vehicle safely. Disconnect the shift rod from the
selector lever. Remove the front exhaust pipe. Remove the heat insulator.
Matchmark the driveshaft companion and yoke flanges, then remove the
driveshaft.
Unbolt and remove the starter. Disconnect the speedometer cable.
Label and disconnect the inhibitor switch connector, the turbine sensor
connector, the lock-up solenoid connector and the solenoid valve connector
from the wiring harness.
Remove the oil vacuum pipes, then plug the ends. Remove the undercover.
Support the transmission with a suitable jack and unbolt the crossmember.
Matchmark the drive plate and torque converter for realignment, then
remove the converter bolts.
Using the special tool, remove the torque converter housing-to-engine
bolts and separate the transmission from the drive plate. Push the wiring
harness bracket off to the side. Remove the transmission from the vehicle.
To install:
Raise the transmission into the vehicle, then align the matchmarks on the
torque converter and the drive plate. Install the torque converter
housing-to-engine bolts and torque them down in an alternate pattern to 27-38
ft. lbs. (37-51 Nm). Attach the wiring harness to the transmission and torque
the bracket bolt to 23-34 ft. lbs. (31-46 Nm). Install the drive plate bolts
and snug them first. Using the special tool, finally tighten them evenly to
25-36 ft. lbs. (34-49 Nm).
Attach the crossmember to the frame and torque the bolts to 29-42 ft. lbs.
(39-60 Nm). Remove the transmission jack and install the under cover.
Install the vacuum and oil pipes.
Engage all the wiring multi-connectors to the wiring harness.
Connect the speedometer cable and install the starter.
Align the driveshaft yoke and companion flanges, then connect the
driveshaft. Torque the driveshaft bolts to 27-38 ft. lbs. (37-51 Nm).
Connect the exhaust pipe using a new gasket. Torque the through-bolt to
12-17 ft. lbs. (16-23 Nm) and the nuts to 23-34 ft. lbs. (31-46 Nm). Install
the heat insulator.
Connect the shift rod to the selector lever using a new spring clip.
Fill the transmission to the proper level and replace the oil level gauge.
Connect the negative battery cable.
1979-85 RX-7
To remove and install the drive plate bolts, a special angle
wrench/adapter (No. 49-0877-45) is required. This wrench has a cutout in the
center to accept the drive of a torque wrench.
Disconnect the negative battery cable.
Disconnect the inhibitor switch connector.
Apply the parking brake and block the wheels.
Remove the converter housing upper cover.
Disconnect the vacuum sensing tube from the vacuum diaphragm.
Remove the air cleaner assembly and the converter housing side cover.
Remove the bolts attaching the transmission to the rear end of the engine.
Raise and support the vehicle safely.
Remove the front, the rear and the converter under covers.
Remove the air pipe and the converter brackets.
Remove the rear of the exhaust pipe and the pellet converter assembly.
Remove the front exhaust pipe and the monolith converter assembly.
Remove the floor under covers.
Remove the driveshaft, then install the turning holder tool 49-0259-440
into the rear of the extension housing, to prevent the fluid from leaking from
the housing.
Disconnect the starter wiring connectors.
Remove the starter and the lower converter housing cover.
For reinstallation purposes, place an alignment mark on the drive plate
and the torque converter.
Remove the bolts securing the torque converter to the drive plate.
Remove the bolts that attach the transmission to the rear of the engine.
Properly support both the engine and the transmission assemblies.
Disconnect the speedometer cable and the selector rod at the selector
lever.
Remove the nuts that attach the transmission support to the body.
Using a transmission removal jack, lower the transmission slightly and
remove the fluid coolant tubes.
Slide the transmission rearward, until the input shaft clears the
eccentric shaft, then remove the transmission/torque converter assembly from
under the vehicle.
To install:
Position the transmission under the vehicle and slide the unit forward
until the input shaft engages the eccentric shaft. Make sure that the
matchmarks on the torque converter and drive plate are aligned. Connect the
fluid tubes to the transmission.
Install the transmission support-to-body nuts and tighten them evenly.
Connect the shift rod to the selector lever and connect the speedometer
cable to the transmission.
Remove the transmission jack and install the converter-to-drive plate
bolts. Torque the bolts to 25-36 ft. lbs. (34-49 Nm) using the special tool.
Install the lower converter housing cover and the starter.
Connect the driveshaft and install the floor under covers.
Connect the monolith converter and exhaust pipe assemblies using new
gaskets.
Connect the pellet converter and rear exhaust pipe section using new
gaskets. Install the converter brackets and the air pipe. Install the
undercovers (front, rear and converter).
Lower the vehicle and install the transmission-to-rear engine bolts.
Torque the bolts to 23-34 ft. lbs. (31-46 Nm).
Install the converter housing side cover and the air cleaner assembly.
Connect the vacuum sensing tube to the diaphragm. Install the converter
housing upper cover.
Connect the inhibitor switch connector and the negative battery cable.
Fill the transmission to the proper level. Adjust the inhibitor switch and
shift linkage as required.
1986-89 RX-7
To remove and install the drive plate bolts, a special angle
wrench/adapter (No. 49-0877-45) is required. This wrench has a cutout in the
center to accept the drive of a torque wrench.
Disconnect the negative battery cable. Raise and safely support the
vehicle.
Remove the exhaust pipe with the heat insulator.
Matchmark and disconnect the driveshaft. Install the turning holder tool
49-0259-440 into the rear of the extension housing, to prevent the fluid from
leaking from the housing.
Remove the vacuum and oil pipes, then plug the ends.
Remove the starter bracket and starter.
Disconnect the speedometer cable.
Disconnect the shift rod from the transmission.
Remove the oil level gauge and filler pipe.
Disengage the harness multi-connector.
Remove the service hole coupler.
Support the transmission with a jack and remove the transmission mounting
bolts. Slide the transmission rearward, until the input shaft clears the
eccentric shaft, then remove the transmission/torque converter assembly from
under the vehicle.
To install:
Position the transmission under the vehicle and slide the unit forward
until the input shaft engages the eccentric shaft. Make sure that the
matchmarks on the torque converter and drive plate are aligned. Install the
transmission-to-engine bolts and torque them to 23-34 ft. lbs. (31-46 Nm).
Install the service hole coupler and engage the harness multi-connector.
Install the filler pipe and oil level gauge.
Connect the shift rod to the control lever on the transmission.
Connect the speedometer cable.
Install the starter and starter bracket.
Connect the vacuum and oil pipes.
Remove the holding tool and connect the driveshaft flanges and torque the
bolts to 36-43 ft. lbs. (49-58 Nm).
Install the exhaust pipe and heat insulator.
Connect the negative battery cable. Fill the transmission to the proper
level. Adjust the inhibitor switch and shift linkage as required.