Most 1978 and later models require that the ignition timing be
adjusted with the vacuum line connected to the distributor. Refer to the
emission sticker (under the hood) to determine if the vacuum line is to be
connected or disconnected and plugged. If the sticker is missing, see a dealer
about obtaining a replacement with the proper calibrations for your
vehicle.
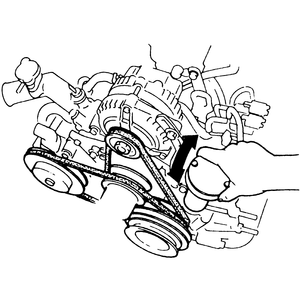
If required, disconnect and plug the distributor vacuum line. Though this
is not required on most late model cars, it is needed on the 1986-87 626. On
that model, be sure to disconnect BOTH vacuum lines and plug them.
A small pencil or old golf tee works well for this
purpose.
Ignition timing marks-1978-79
GLC
Ignition timing marks-1980
GLC
Ignition timing marks-front wheel drive
GLC
Set the parking brake and block the front wheels. Put automatic
transmission cars in Neutral.
Turn off all electrical loads on all models (don't forget the heater fan).
If the car has an electric fan, unplug the electrical connector.
On the 1986-89 323 with electronic fuel injection, disconnect the black
connector at the distributor.
Start and run the engine until it reaches the normal operating
temperature. Shut the engine OFFand connect a tachometer.
Restart then engine, then check the engine idle speed and adjust if
necessary. Shut the engine OFF..
Prior to starting the engine, clean off any grease or oil that
will prevent seeing the timing marks on the crankshaft pulley. Mark the pulley
notches with chalk or paint.
Ignition timing marks-323
Ignition timing marks-1983-85
626
Ignition timing marks-1986-87
626
While aiming the timing light, rotate the distributor
as necessary to align the designated timing
marks
Connect a timing light to the engine following the tool manufacturer's
instructions. Start the engine and observe the timing by pointing the light at
the timing marks on the crankshaft pulley.
If the car is equipped with an automatic transmission, check
the emission sticker or tune-up specifications for transmission gear selections.
Most models require the timing to be checked with the transmission in Drive,
though some calibrations may require Neutral.
If the timing is not correct, loosen the distributor mounting bolt and
rotate the distributor as necessary to produce the correct timing mark
alignment. Recheck the timing after tightening the lock bolt and readjust if
necessary. Check the idle speed.
Some Canadian models require that the bullet connectors at the
water temperature wiring be disconnected before timing the ignition; check the
emission sticker for requirements.
Reconnect the vacuum line(s) or bullet connectors, if applicable. Recheck
the idle speed and readjust, if necessary.
1988-89 626 AND MX-6
Prior to starting the engine, clean off any grease or oil that
will prevent seeing the timing marks on the crankshaft pulley.
Warm up the engine to normal operating temperature.
Stop the engine and turn all electrical accessories to the off position.
Connect a tachometer and timing light to the engine in accordance with the
tool manufacturer's instructions.
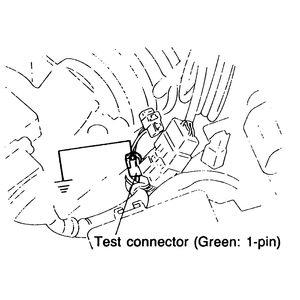
Connect a jumper wire from the test connector to a suitable ground.
Start the engine and allow it to run at idle speed. Check and adjust the
idle to specification, if necessary.
On non-turbocharged engines, disconnect the two vacuum hoses from the
vacuum control unit and plug them. Leave the test connector grounded.
Aim the timing light at the crankshaft pulley and check that the yellow
mark on the pulley is aligned with the mark on the timing belt cover.
If the marks are not aligned, loosen the distributor bolt and move the
distributor housing either clockwise or counterclockwise until the timing
marks are properly aligned.
Tighten the distributor bolt and connect the vacuum hoses to the control
unit (non-turbocharged engines).
Stop the engine, then disconnect the timing light and tachometer. Remove
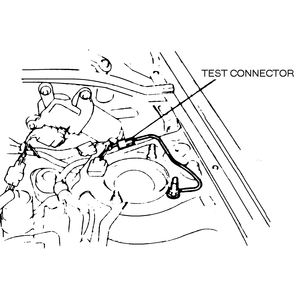
the jumper wire from the test connector.
Ground the test connector to check/adjust ignition
timing-626 and MX-6
Ignition timing marks-1988-89 626 and
MX-6
929
Prior to starting the engine, clean off any grease or oil that
will prevent seeing the timing marks on the crankshaft pulley.
Warm up the engine to normal operating temperature. Check the idle speed
and adjust as necessary.
Stop the engine and turn all electrical accessories to the off position.
Ground the green test connector pin with a jumper wire, as shown in the
illustration.
Ground the test connector to check/adjust ignition
timing-929
Ignition timing marks-929
Start the engine and allow it to run at idle speed. Check and, if
necessary, adjust the idle to specification.
Connect a timing light to the No. 1 spark plug wire. If you are using a
non-inductive timing light, the engine must first be stopped in order to wire
the light inline with the No. 1 spark plug.
For accuracy and ease of use an inductive timing light is
highly recommended on these vehicles.
Check the timing using the light by illuminating the timing marks on the
crankshaft pulley and the ignition timing scale.
If the timing is not within specification, loosen the distributor bolt and
rotate the distributor housing to adjust the timing.
When the timing is correct, tighten the distributor bolt, then stop the
engine.
Disconnect the timing light and remove the jumper wire from the test
connector.
Rotary Engines
1979 RX-7
This timing procedure applies to all 1979 RX-7s EXCEPT those
after chassis No. 522504 that are equipped with an automatic transmission. For
1979 RX-7s after chassis No. 522504 with an automatic transmission, see the
procedure which immediately follows.
Warm the engine up until it reaches operating temperature, then shut the
engine OFFand connect a tachometer.
On automatic transmission equipped vehicles, securely apply the handbrake,
block the wheels, and put the car in Drive.
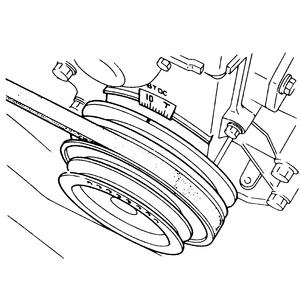
Timing marks on 1979-85 RX-7s-the arrow points to the
LEADING mark, while the TRAILING mark is beside
it
On early model 1979 RX-7s (and late models with MT),
adjust the leading timing by rotating the distributor, then adjust the
trailing timing by moving the vacuum unit (MT) or adjusting lever (AT) in
or out
Read the tachometer as for a conventional four cylinder engine to verify
that the engine is running at its normal idle speed. If not, adjust idle speed
to specification.
Stop the engine and connect a timing light to the leading (lower) spark
plug of the front rotor. Then, restart the engine. Aim the timing light at the
pin on the front housing cover and observe the timing.
If the timing pointer does not line up with the first (yellow) notch on
the pulley, loosen the distributor locknut and rotate the distributor either
way until timing is correct. Tighten the locknut and check that timing is
still correct.
Stop the engine and connect the timing light to the trailing (upper) spark
plug of the front rotor. Start the engine (put automatic transmission equipped
cars in Drive), and check the trailing timing. The timing pointer should line
up with the second (red) notch in the pulley.
If the trailing timing is not correct, loosen the vacuum unit attaching
screws (manual transmission) or the adjusting lever attaching screws
(automatic transmission), and move the vacuum unit (manual transmission) or
adjusting lever (automatic transmission) in or out until the timing pointer
lines up with the second mark on the pulley. Then, tighten the screws and
recheck the timing.
1979 RX-7 WITH AUTOMATIC TRANSMISSION AFTER CHASSIS NO. 522504
Warm the engine up until it reaches operating temperature, then shut the
engine OFFand connect a tachometer.
On automatic transmission equipped vehicles, securely apply the handbrake,
block the wheels, and put the car in Drive.
Read the tachometer as for a conventional four cylinder engine to verify
that the engine is running at its normal idle speed. If not, adjust idle speed
to specification.
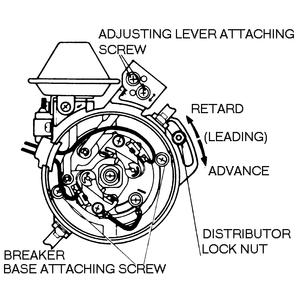
On late model 1979 RX-7s (with AT), adjust the trailing
timing by loosening the breaker base attaching screws, then loosen the
external lever attaching screws and move the lever in or out
Stop the engine and connect a timing light to the leading (lower) spark
plug of the front rotor. Then, restart the engine. Aim the timing light at the
pin on the front housing cover and observe the timing.
If the timing pointer does not line up with the first (yellow) notch on
the pulley, loosen the distributor locknut and rotate the distributor either
way until timing is correct. Tighten the locknut and check that timing is
still correct.
Stop the engine and connect the timing light to the trailing (upper) spark
plug of the front rotor. Start the engine (put automatic transmission equipped
cars in Drive), and check the trailing timing. The timing pointer should line
up with the second (red) notch in the pulley.
To adjust the trailing timing, stop the engine and remove the distributor
cap and rotor.
Slightly loosen the breaker base attaching screws, then reinstall the
rotor and distributor cap.
Start the engine. Set the transmission selector lever in Drive and run the
engine at idle speed. Move the external adjusting lever in or out until the
timing pointer lines up with the second (red) mark on the pulley, then tighten
the adjusting lever attaching screws.
Stop the engine, remove the distributor cap and rotor, and tighten the two
breaker base attaching screws.
Install the rotor and cap, then recheck the trailing timing.
1980-85 RX-7
Warm up the engine to normal operating temperature.
Stop the engine and connect a tachometer.
For all 1980-85 RX-7s, adjust the leading timing by
rotating the distributor, then adjust the trailing timing by moving the
vacuum unit (MT) or adjusting lever (AT) in or out
Connect a timing light to the wire of the leading (lower) spark plug on
the front rotor.
To check/adjust the leadingtiming:
Start the engine and run it at the specified idle speed. Verify that the
engine is running at its normal idle speed. If not, adjust idle speed to
specification.
Aim the light at the front cocver timing indicator pin.
If the timing pointer does not line up with the first (yellow) notch on
the pulley, loosen the locknut and rotate the distributor until the timing
is correct. Tighten the locknut and check that the timing is still correct.
To check/adjust the trailingtiming:
Stop the engine and connect the timing light to the trailing (upper)
spark plug on the front rotor. Start the engine, position the detent lever
in Drive (AT vehicles), and check the trailing timing. The pointer should
line up with the second (red) notch in the pulley.
If the trailing timing is not correct, loosen the vacuum unit attaching
screws on vehicles equipped with manual transmission or the adjusting lever
attaching screws on vehicles equipped with automatic transmission. Move the
vacuum unit or adjusting lever in or out until the timing pointer lines up
with the second mark on the pulley, then tighten the screws and recheck the
trailing timing.
1986-89 RX-7
1986-89 models do not use a distributor. Instead, ignition timing
is adjusted by means of a crank angle sensor. The sensor is mounted in the front
rotor housing and extends down towards the eccentric shaft. The sensor detects
the angle of the eccentric shaft and feeds this information to the control unit
in the form a reference signal. This, along with other input signals, allows the
control unit to monitor the various engine operating conditions which it uses to
calculate ignition timing.
Warm up the engine to normal operating temperature.
Stop the engine, connect a tachometer and turn off all accessories.
Ignition timing marks-1986-89
RX-7
On 1986-89 RX-7s, ignition timing is adjusted by
rotating the crank angle sensor
Start the engine and verify that the engine is running at its normal idle
speed. If not, adjust idle speed to specification.
To Check/Adjust the leadingtiming:
Connect a timing light to the lower spark plug wire from the front
rotor.
Aim the light at the pulley and verify the yellow plulley timing mark is
aligned with the indicator pin.
If the marks are not aligned, remove the rubber cap that covers the
crank angle sensor adjusting bolt.
Loosen the bolt and move the crank angle sensor to adjust the leading
timing.
To Check/Adjust the trailingtiming:
Connect the timing light to the upper spark plug wire from the front
rotor.
Check that the red pulley mark aligns with the indicator pin.
If not, loosen the adjusting bolt and rotate the crank angle sensor to
align the marks.
Tighten the crank angle sensor adjusting bolt and install the rubber
cap. Recheck the timing.