
Spark plug heat range
The tune-up is a routine maintenance operation which is essential for the efficient and economical operation, as well as for the long life of your car's engine. The interval between tune-ups is a variable factor which depends upon the way you drive your car, the conditions under which you drive it (weather, road type, etc.), and the type of engine installed in your car. It is generally correct to say that no car should be driven more than 30,000 miles (48,309 km) between tune-ups, especially in this era of emission controls. If you plan to drive your car extremely hard or under severe weather conditions, the tune-ups should be performed at closer intervals. High performance engines require more frequent tuning than other engines, regardless of weather or driving conditions. Maintenance intervals will be provided whenever possible, but for a complete and comprehensive breakdown, please refer to the Maintenance Interval Charts in Section 1 of this manual.
A small note book or log is recommended for recording the completion of all regular maintenance activities, as well as their dates and intervals.
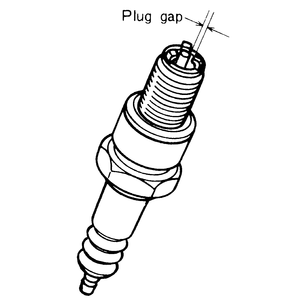
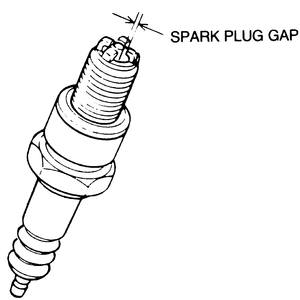
A typical spark plug consists of a metal shell surrounding a ceramic insulator. A metal electrode extends downward through the center of the insulator and protrudes a small distance. Located at the end of the plug and attached to the side of the outer metal shell is the side electrode. The side electrode bends in at a 90 degree angle so that its tip is even with, and parallel to, the tip of the center electrode. The distance between these two electrodes (measured in thousandths of an inch or millimeters) is called the spark plug gap. The spark plug in no way produces a spark but merely provides a gap across which the current can arc. The coil produces between 20,000 and 40,000 volts. This high voltage travels to the distributor where it is routed through the spark plug wires to the spark plugs. The current passes along the center electrode and jumps the gap to the side electrode; in so doing, it ignites the air/fuel mixture in the combustion chamber.
For the rotary engine used in the RX-7, each of the two rotors in the engine is equipped with both a leading and a trailing spark plug. The leading spark plug fires first, igniting the fuel/air mixture as in conventional engines; the trailing plug fires a moment later, igniting any unburned mixture. This aids in more complete combustion and helps to reduce exhaust emissions.
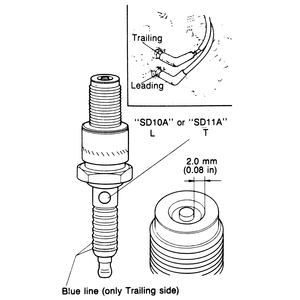
On 1986-89 models, the leading and trailing side spark plugs are different and must be installed in the proper position. Trailing side spark plugs are identified by blue lines on the top of the porcelain section of the plug.
The 1979-80 RX-7 uses a special three electrode spark plug for better ignition characteristics. The 1981-85 model uses a four electrode spark plug which, due to rotor housing modification, is the only type spark plug which can be used. On 1986-89 models, the spark plug incorporates a design that deletes the side electrodes and only uses the center electrode to produce a spark. Spark plug gap on these models is not adjustable. Use only the appropriate special type of spark plug for any RX-7 model.
Spark plug heat range is the ability of the plug to dissipate heat. The longer the insulator (or the farther it extends into the engine), the hotter the plug will operate; the shorter the insulator the cooler it will operate. A plug that absorbs little heat and remains too cold will quickly accumulate deposits of oil and carbon since it is not hot enough to burn them off. This leads to plug fouling and consequently to misfiring. A plug that absorbs too much heat will have no deposits, but, due to the excessive heat, the electrodes will burn away quickly and in some instances, pre-ignition may result. Pre-ignition takes place when plug tips get so hot that they glow sufficiently to ignite the fuel/air mixture before the actual spark occurs. This early ignition will usually cause a pinging during low speeds and heavy loads.
|
|
Spark plug heat range |
The general rule of thumb for choosing the correct heat range when picking a spark plug is: if most of your driving is long distance, high speed travel, use a colder plug; if most of your driving is stop and go, use a hotter plug. Original equipment plugs are compromise plugs, and most people never have reason to change their plugs from the factory recommended heat range.
Some of the spark plugs listed in this chapter are especially designed and built for use in the Mazda rotary engine. Use only these plugs; do NOT substitute a different type of plug.
A set of spark plugs usually requires replacement after about 10,000 miles (16,103 km) on cars with conventional ignition systems and after about 20,000-30,000 miles (32,206-48,309 km) on cars with electronic ignition, depending on your style of driving. In normal operation, plug gap increases about 0.001 in. (0.025mm) for every 1,000-2,500 miles (1,610-4,026 km). As the gap increases, the plug's voltage requirement also increases. It requires a greater voltage to jump the wider gap and about two-to-three times as much voltage to fire a plug at high speeds than at idle.
Special platinum tipped spark plugs may be available for some of the vehicles covered by this manual. These plugs wear at a greatly reduced rate when compared with conventional plugs. Refer to the plug manufacturers recommendations for service intervals, though keep in mind that periodic inspection is always a good idea.
On the RX-7, all of the ignition components for the leading spark plugs have darker colored caps on their wires than the trailing spark plug components. Even so, when replacing the spark plugs, it would be wise to remove and replace one plug at a time and reconnect its cable before moving on to the next plug. The spark plug holes can be identified by the letter and number codes adjacent to them. T1means trailing spark plug, first rotor, L1means leading spark plug, first rotor, etc.
Regardless of your type of vehicle and its ignition system, it is advisable to only work on one spark plug at a time. Don't start by removing the plug wires all at once, because unless you number them, they may become mixed up. Take a minute before you begin and number the wires with tape. The best location for numbering is near where the wires come out of the cap.
 |
|
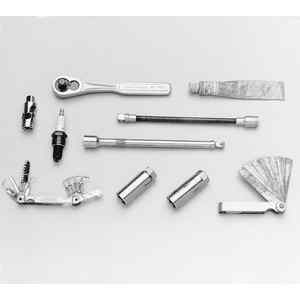
A variety of tools and gauges is needed for spark plug
service |
 |
|
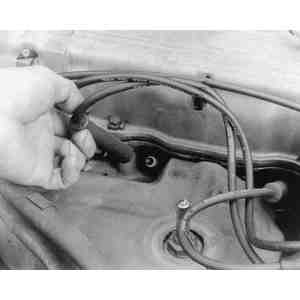
Grasp and pull the spark plug wire by the boot
only |
 |
|
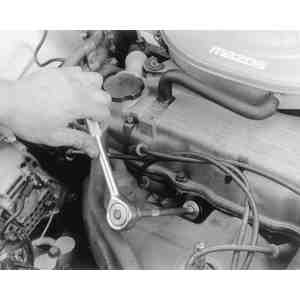
Use the correct size deep-well socket and an extension
to remove spark plugs |
 |
|
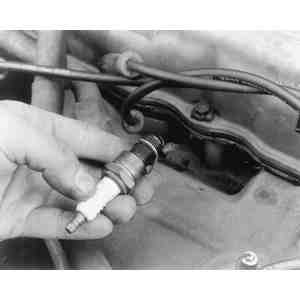
Be sure to remove the crushable gasket with the
plug |
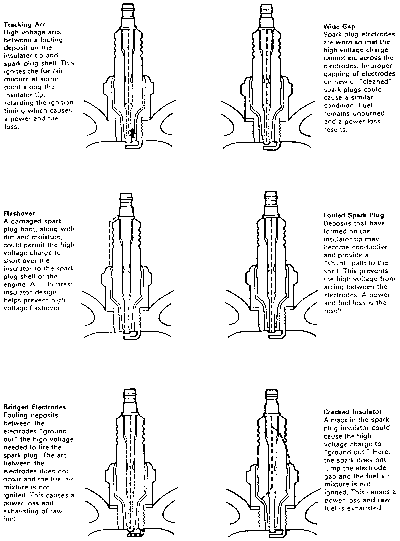
Unless any underlying problem is corrected, a replacement spark plug may also fail prematurely.
 |
|
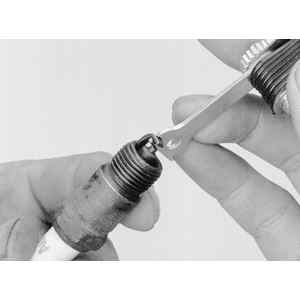
Checking the spark plug gap with a feeler
gauge |
 |
|
Adjusting the spark plug gap |
When tightening plugs which are equipped with crush washers, a good rule of thumb is to finger-tighten the plug until the washer comes in contact between the plug shoulder and the cylinder head. Then tighten the plug 1/4 turn to flatten the crush washer.
 |
|
Inspect the spark plug to determine engine running
conditions |
 |
|
Used spark plugs which are damaged may indicate fuel,
electrical or engine mechanical problems |
If compressed air is available, use it to blow any dirt or debris away from the spark plug hole. Be sure to wear safety goggles when using compressed air.
 |
|
Measure the gap between the center electrode and all
three side electrodes-1979-80 RX-7 |
 |
|
Measure the gap between the center electrode and all
four side electrodes-1981-85 RX-7 |
 |
|
Spark plug used on 1986-89 RX-7. Although it can be
measured, the plug gap is non-adjustable. |
On 1986-89 RX-7 models, do not use a spark plug cleaning machine because sand particles may become trapped in the tip of the plug and damage the plug.
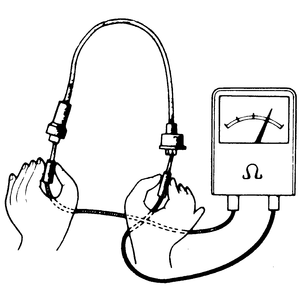
Visually inspect the spark plug cables for burns, cuts, or breaks in the insulation. Check the spark plug boots and the nipples on the distributor cap and coil. Replace any damaged wiring. If no physical damage is obvious, the wires can be checked with an ohmmeter for excessive resistance. Remove the first wire from the spark plug and the distributor cap, and connect one of the leads from the ohmmeter to each end of the wire. Factory recommendations are that resistance should not exceed 22,400 ohms per 39.37 in. (1 meter) of cable. The factory preferred resistance per 39.37 in. (1 meter) is 16,000 ohms.
When installing a new set of spark plug cables, replace the cables one at a time so there will be no mix-up. Start by replacing the longest cable first. Install the boot firmly over the spark plug. Route the wire exactly as the original was routed. Insert the nipple firmly into the tower on the distributor cap. Repeat the process for each cable, including the one which runs from the center of the distributor cap to the ignition coil. (On the RX-7, there are two ignition coil cables running to the distributor cap.)
 |
|
Checking spark plug cable resistance with an
ohmmeter |
 |
|
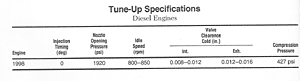
Diesel Engine Tune-Up
Specifications |
 |
|
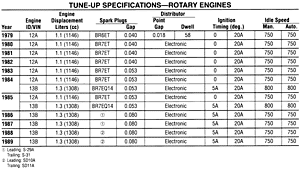
Rotary Engine Tune-Up
Specifications |
 |
|
Gasoline Engine Tune-Up
Specifications |